
Extra addons - Πως να τα εγκαταστήσετε
- Sparkys Addon
A great new add-on called Sparkys Streams by Sparky is available through the Metal Kettle repo. If you already have MK's repo installed you can install it from the video add-ons section. If you don't have the repo installed this guide will show you how to install it and the add-on.
To Install:
Open Kodi
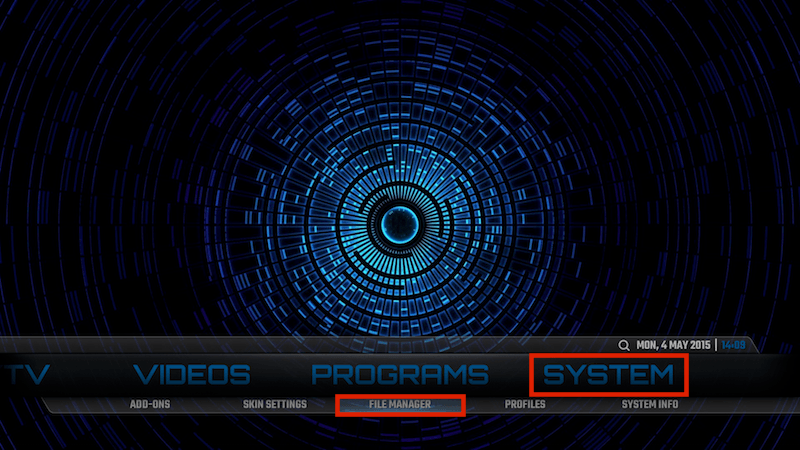
Select SYSTEM > File Manager
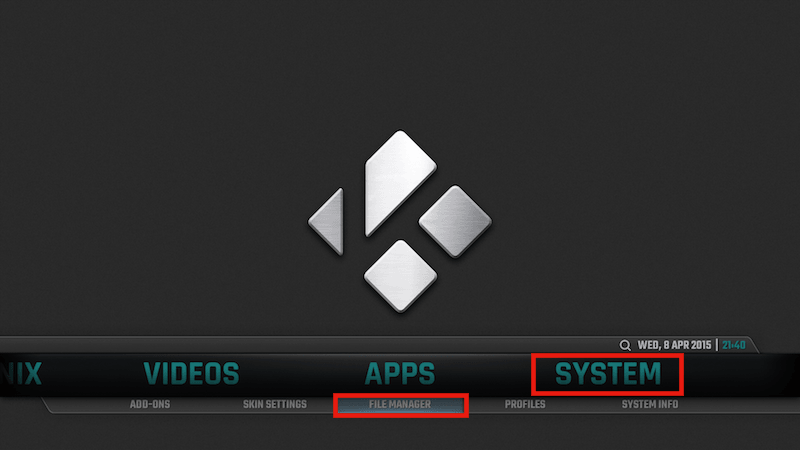
Select Add Source
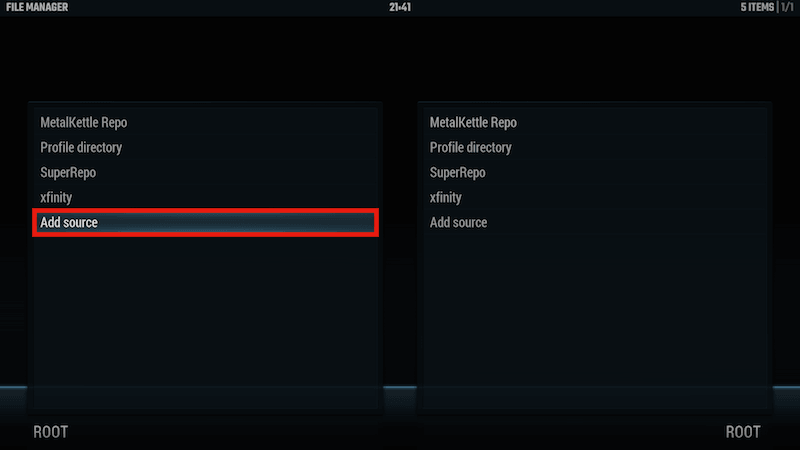
Select None
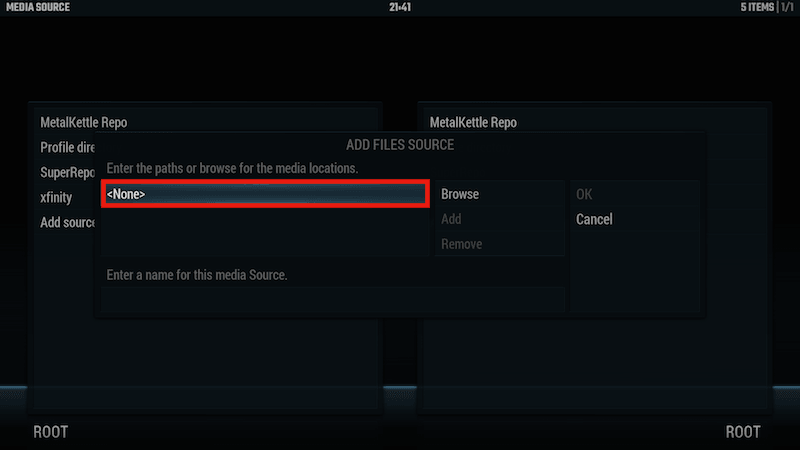
Type the following EXACTLY http://kodi.metalkettle.co and select Done

Highlight the box underneath Enter a name for this media Source

Type MK Repo or whatever you want to call the repo

Select OK

Go back to your Home Screen
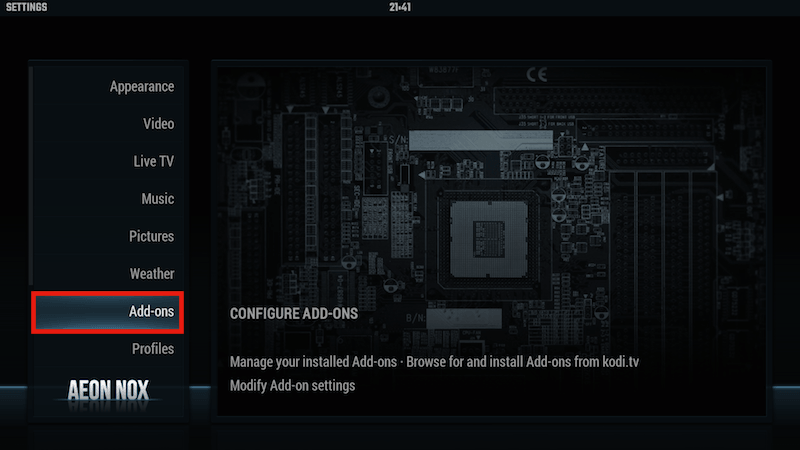
Select SYSTEM
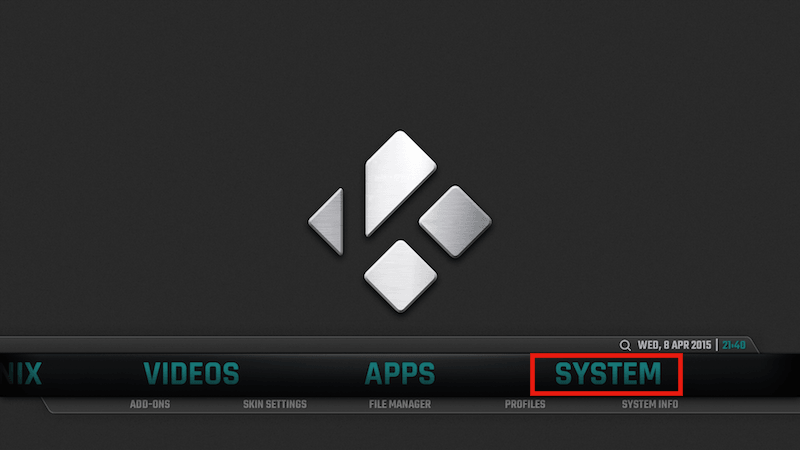
Select Add-Ons
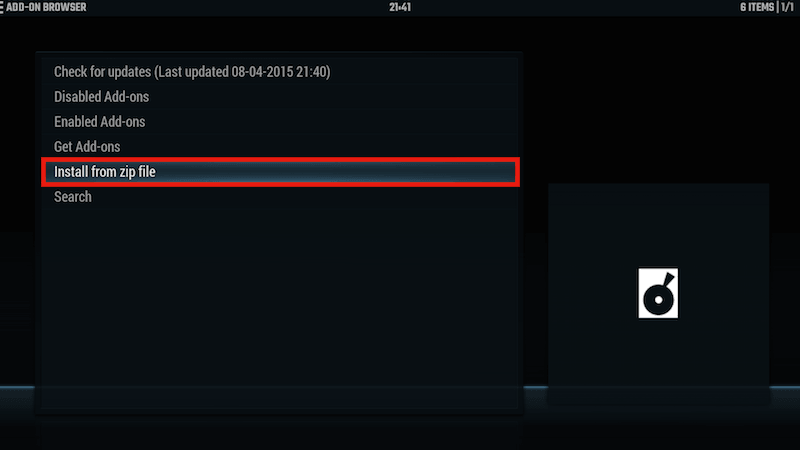
Select Install from Zip File
Select MK Repo or whatever you called it

Select repository.metalkettle-1.4.3.zip

Wait for Add-on Enabled Notification

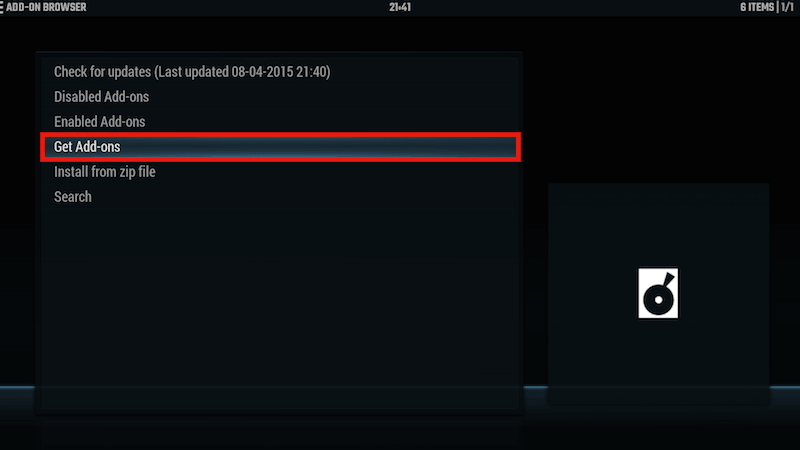
Select Get Add-ons

Select MetalKettles Addon Repository

Select Video Add-ons

Select Sparkys Streams

Select Install

Wait for Add-on Enabled Notification

Sparkys Streams is now installed and ready to use. As usual the add-on can be accessed via VIDEOS > Add-Ons > Sparkys Streams.
2. Lihat TV addon
LihatTV is yet another add-on with IPTV channels. This add-on gives you access to over 2000 channels.
This was found over on the KodiNow website and once again my main man Alanpointed it out to me
LihatTV also has a Facebook page.
To Install:
Open Kodi
Select SYSTEM > File Manager
Select Add Source
Select None
Type the following EXACTLY http://lihattv.com/install and select Done

Highlight the box underneath Enter a name for this media Source
Type lihattv. You can call it anything you want though

Select OK

Go back to your Home Screen
Select SYSTEM
Select Add-Ons
Select Install from Zip File
Select lihattv or whatever you called it

Select XBMC Kodi Add-ons.zip

Wait for Add-On Enabled notification

LihatTV is now installed and ready to use. As usual the add-on can be accessed viaVIDEOS > Add-Ons > lihattv | Live TV Streaming
LihatTV is yet another add-on with IPTV channels. This add-on gives you access to over 2000 channels.
This was found over on the KodiNow website and once again my main man Alanpointed it out to me
LihatTV also has a Facebook page.
To Install:
Open Kodi
Select SYSTEM > File Manager
Select Add Source
Select None
Type the following EXACTLY http://lihattv.com/install and select Done
Highlight the box underneath Enter a name for this media Source
Type lihattv. You can call it anything you want though
Select OK
Go back to your Home Screen
Select SYSTEM
Select Add-Ons
Select Install from Zip File
Select lihattv or whatever you called it
Select XBMC Kodi Add-ons.zip
Wait for Add-On Enabled notification
LihatTV is now installed and ready to use. As usual the add-on can be accessed viaVIDEOS > Add-Ons > lihattv | Live TV Streaming
3. AAA Live addon
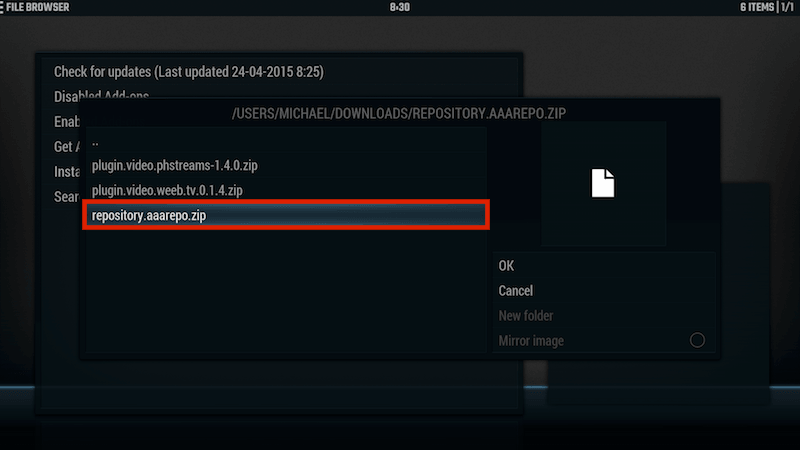
Download the AAA Repo Zip and save to a location you can easily access from your Kodi device
Open Kodi / XBMC
Select SYSTEM
Select Add-Ons
Select Install from zip file
Navigate to the zip you downloaded in the first step and selectrepository.aaarepo.zip
Wait for Add-On Enabled Notification
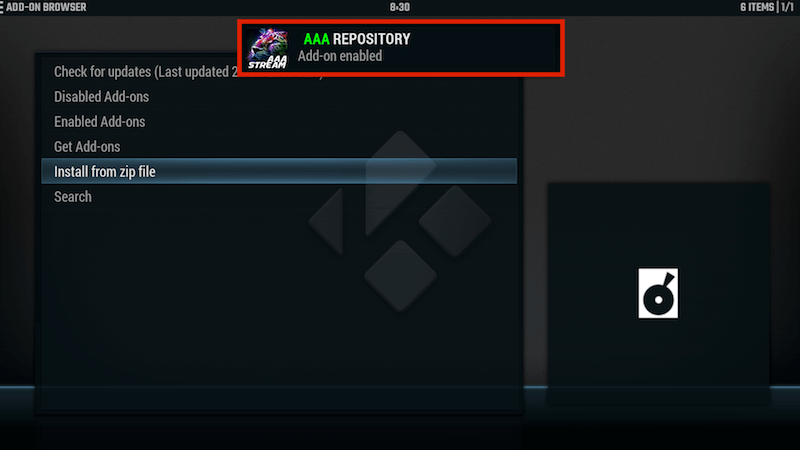
Select Get Add-Ons
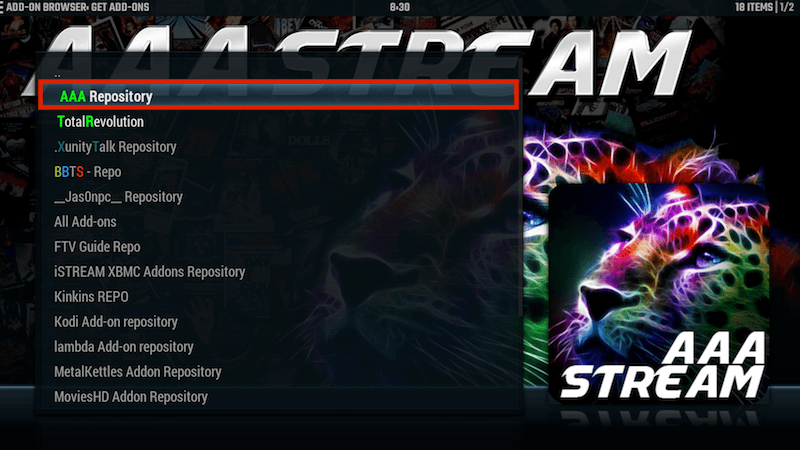
Select AAA Repository
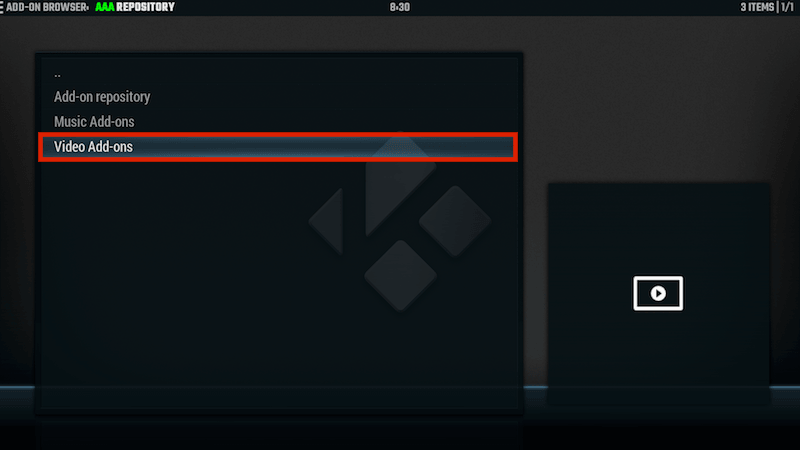
Select Video Add-Ons
Select .AAA Live TV

Select Install

Wait for Add-On Enabled notification

AAA Live TV is now installed and ready to use.
As usual the add-on now can be accessed via VIDEOS > Add-Ons > .AAA Live TVfrom your home screen.
4. Pluto TV addon
Here is a guide for installing the Pluto.TV add-on on your Kodi device. It has lots of channels available all of which are categorised making it easy to find what you want to watch.
It is available though Kinkins repo. If you have that installed just grab it from the video add-ons section. If not this guide will show you how to install the repo and add-on.
Thanks Alan Colman for showing me this one.
How To Install Pluto.TV on Kodi:
Open Kodi
Select SYSTEM > File Manager
Select Add Source
Select None
Type the following EXACTLY http://kodi.metalkettle.co and select Done
Highlight the box underneath Enter a name for this media Source
Type MK Repo
Select OK
Go back to your Home Screen
Select SYSTEM

Select Add-Ons
Select Install from Zip File
Select MK Repo
Select Recommended Repositories

Select repository.Kinkin-1.2.zip
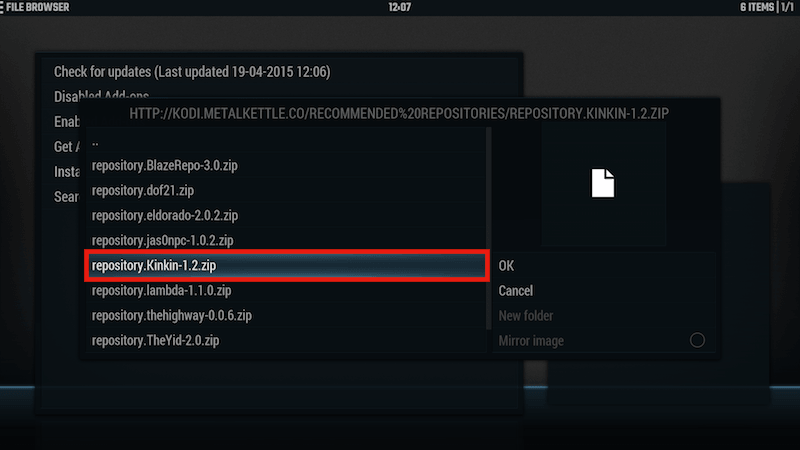
Wait for Add-On Enabled Notification
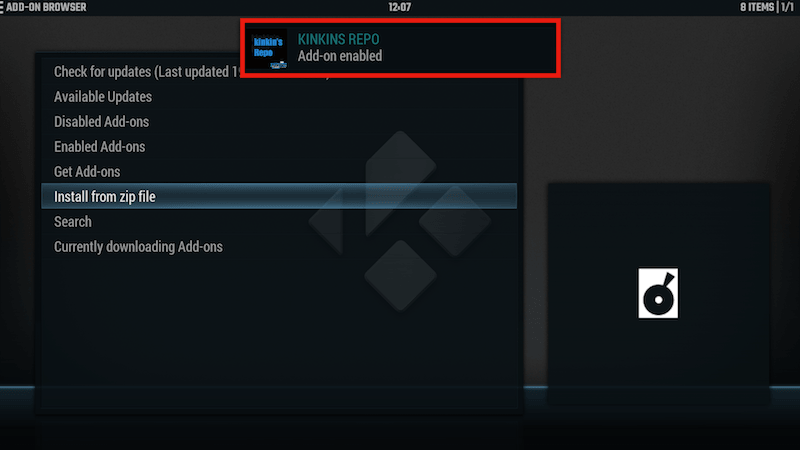
Select Get Add-Ons
Select Kinkins REPO
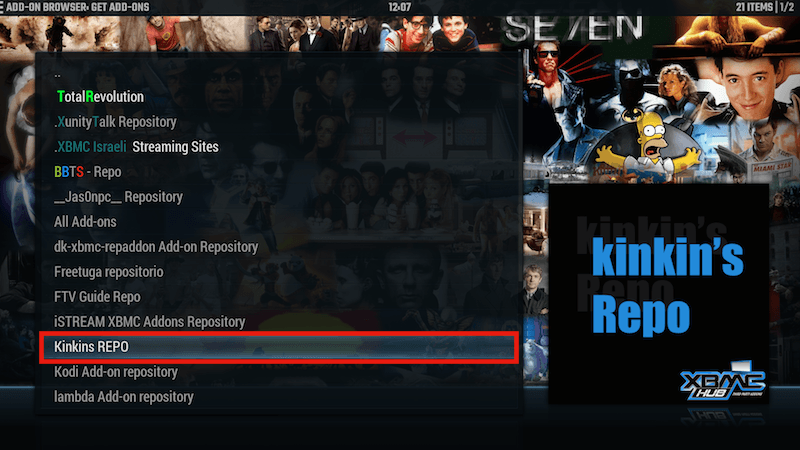
Select Video Add-ons

Select Pluto.TV

Select Install

Wait for Add-On Enabled Notification

Pluto.TV is now installed and ready to use. As usual the add-on can be accessed viaVIDEOS > Add-Ons > Pluto.TV from the Home Screen

Pluto TV is a website which provides live TV streaming for free. Install Pluto TV on FireStick and enjoy favorite channels live from anywhere in the world
ΑπάντησηΔιαγραφήRead more: https://blog.fastestvpn.com/install-pluto-tv-on-firestick/